Owning a garage means dealing with the inevitable wear and tear that comes with time, which includes replacing your garage door seal. This small but vital component plays a crucial role in preserving energy efficiency within your home and protecting it from various weather conditions.
If you notice drafts or moisture creeping into your garage, it’s high time to replace the seal yourself! In this comprehensive blog post, we’ll guide you on how to effectively restore your garage door’s insulation through simple DIY steps while debunking some common myths along the way.
Stay tuned as we explore various sealing techniques and give you valuable maintenance tips to prolong the life of your new seals.
Key Takeaways
- Garage door seals are essential for preventing drafts, water, pests, and debris from entering your garage while also maintaining a consistent temperature inside.
- To replace your garage door seal yourself, gather the necessary tools and materials; remove the old seal carefully; clean the area thoroughly before measuring and cutting the new seal to size; finally install it with precision.
- When selecting a new seal for your garage door, consider factors such as weatherstripping type (bottom, side or top), material quality, durability and price.
- Regular cleaning and inspection of your garage door seal can help increase its longevity. Lubricating moving parts is another crucial step in maintaining it regularly.
Understanding The Importance Of Garage Door Seals
Garage door seals are essential in preventing dirt, debris, and unwanted moisture from entering your garage; they also help maintain a consistent temperature inside the space and improve energy efficiency.
Definition Of Garage Door Seals
Garage door seals play a crucial role in maintaining the integrity and functionality of your garage. They are essentially weatherstripping mechanisms designed to fit around the perimeter of the garage door, ensuring that it remains sealed and resistant to external elements such as water, wind, debris, and pests.
There are several types of garage door seals available on the market today, including bottom seals (also known as “T-shaped edges” or “garage door floor seals”), side weatherstripping, top weatherstripping, and threshold seals.
Each type serves a specific purpose in securing different parts of your garage entryway while providing added protection against energy loss through drafts or gaps in insulation.
Reasons Why They Are Important
Garage door seals are crucial for maintaining the integrity of your garage. They prevent air, water, pests and debris from entering your garage space while also keeping heated or cooled air from escaping through leaks.
Additionally, when weatherstripping wears down or breaks apart over time, drafts can let in outdoor elements that affect both your indoor temperature as well as energy bills.
Moreover, since garages often have a direct entry to homes connected to them by an interior door they serve as a buffer between the outside world and your living spaces and thus play a vital role in ensuring comfortable living conditions.
Warning Signs That It’s Time To Replace Them
As garage door seals age, they may become less effective over time. Some warning signs to look out for include drafts or leaks during heavy rain and wind, visible gaps between the seal and the garage floor, and increased noise when opening or closing the garage door.
Additionally, if you notice an increase in your energy bills without any other obvious explanation, it could be a sign that your garage door seal needs replacing.
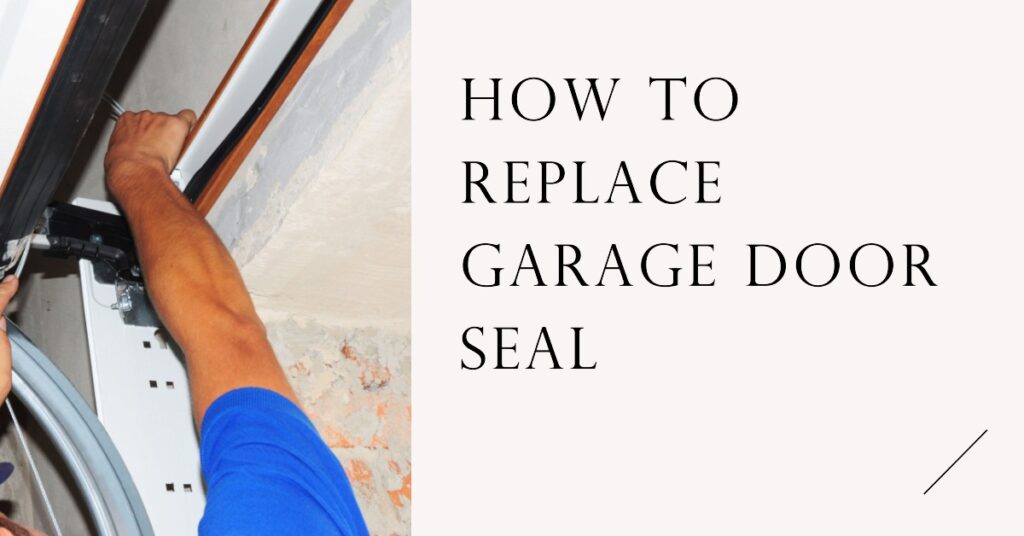
DIY Steps To Replacing Your Garage Door Seal
To replace your garage door seal on your own, gather the necessary tools and materials, remove the old seal carefully, clean the area thoroughly before measuring and cutting the new seal to size; finally install it with precision.
Gather The Necessary Tools And Materials
Before beginning the process of replacing your garage door seal, it is important to gather all the necessary tools and materials. You will need a measuring tape, pliers, screwdriver, utility knife or scissors, cleaning solution such as soap and water or rubbing alcohol, and the replacement seal itself.
It is essential to ensure that you have purchased the correct type of seal for your specific garage door model.
Having all these items on hand before starting will make the process more efficient and save you time running back and forth for missing pieces. Remember that safety should always come first when working with any equipment or tools.
Ensure that you use protective gear such as gloves and goggles where necessary to prevent injury.
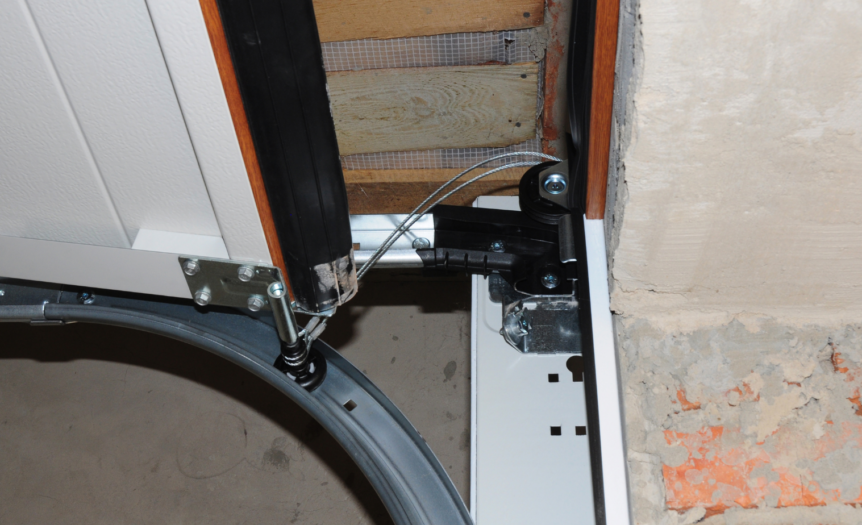
Remove The Old Seal
To remove the old garage door seal, start by closing the door and disconnecting the opener. Then, locate the bottom seal or retainer that is attached to the bottom of your garage door.
Depending on how it was installed, you may need to unscrew some screws or pry off a track before carefully peeling off the old seal from its place.
After removing all sections of weatherstripping from your garage door, be sure to clean up any residue left behind with soap and water.
Clean The Area
Before installing the new garage door seal, it is important to make sure that the area is thoroughly cleaned. This will ensure that there are no dirt, debris, or old adhesive left on the surface which can cause difficulty in attaching the new seal properly.
To clean your garage door properly, you need a few tools such as gloves and cleaning solution. First, put on your gloves to protect your hands from any sharp edges of the garage door metal.
Next, use a cleaning solution mixed with water to wipe down and remove all debris in the surrounding area of where you’ll be placing the new seal. Be sure to pay extra attention to areas near corners and crevices where dirt may accumulate over time.
It’s also important to note that regular cleaning and inspection for your garage door should be done every six months or so as part of maintenance routine as stated in our.
Measure And Cut The New Seal
To ensure a tight and secure seal for your garage door, measuring and cutting the new seal is crucial. First, measure the length of the bottom edge of your garage door to determine how much weatherstripping you will need.
It’s important to get exact measurements, as an ill-fitting seal can cause air leaks and affect energy efficiency.
It’s essential that you cut straight lines and follow any curves or angles in your garage door accurately. If necessary, take breaks while cutting to avoid making mistakes due to fatigue or impatience.
Remember that it’s better to err on the side of caution by cutting slightly less than what you think might be needed. You can always trim more if necessary but replacing excess material is impossible once it has been cut off.
Install The New Seal
To install the new seal, first, measure and cut it to size using a utility knife or scissors. Make sure to get an accurate measurement by measuring twice before cutting. Then, starting from one end of the garage door bottom, slide the T-shaped edge of the new seal into the track along the door’s bottom edge.
Make sure that there are no gaps in between as this will compromise your newly installed weatherstripping. If you need to make any adjustments, use a set of pliers or gently tap with a rubber mallet until snugly fit.
Don’t forget about sealing around the sides and top as well for maximum effectiveness.
Whether you’re looking for garage door insulation products such as threshold seals or rubber gaskets for draft control purposes, Lowe’s has got you covered with durable solutions at budget-friendly prices!
Different Types Of Garage Door Seals And How To Choose The Right One
When choosing a garage door seal, it is important to consider the type of weatherstripping needed for each section of the garage door – bottom, sides, and top – as well as factors such as material, thickness, durability and price.
Bottom Weatherstripping
When it comes to garage door seals, the bottom weatherstripping is one of the most critical components. This type of seal provides a barrier against drafts and pests that may enter your garage from underneath your doors.
Without proper protection, cold air, water, dirt, and unwanted critters can easily slip through the gaps between your garage door and floor.
To choose the right bottom weather stripping for your garage door, you should measure the width of your existing seal to ensure an optimal fit. You can choose from different types such as T-shaped edges or threshold seals depending on how much clearance you have between your door and floor.
Side Weatherstripping
When replacing your garage door seal, it’s essential to consider the side weatherstripping. These seals can wear out due to exposure and age, leading to drafts and leaks.
Side weatherstripping helps keep unwanted elements like dust, debris, wind, and water from entering your garage through the sides of the door.
It’s important to inspect your side weatherstripping regularly for signs of damage or wear such as cracks or tears. Different types of materials are used in making garage door side seals such as vinyl, rubberized fabric or foam.
Making sure you select the right size is also crucial as a mismatched measurement will lead to an ill-fitting seal that won’t provide enough protection for your garage space.
Top Weatherstripping
When it comes to sealing your garage door, the top weatherstripping plays a crucial role in preventing drafts and water from getting inside. This strip is often made of rubber or other flexible materials that can form a tight seal around the top section of your garage door.
One common type of top weatherstripping is called bulb-shaped because it has a rounded top that compresses against the header when the door closes.
Replacing your top weatherstripping can be an easy DIY project if you have some basic tools and know-how. Simply measure the length of your old weatherstrip and purchase a replacement that matches its size and shape.
Then, remove any remaining pieces of the old strip from the header and attach the new one using screws or adhesive as needed.
Factors To Consider When Selecting A New Seal
Choosing the right garage door seal can have a significant impact on your home’s energy efficiency and overall comfort. When selecting a new seal for your garage, there are several factors to consider.
One crucial factor is the type of weatherstripping that will be best suited for your specific needs. Bottom weatherstripping provides excellent protection against drafts and insects while also sealing gaps between the door and floor.
Another important consideration is material selection; seals made from high-quality materials such as EPDM rubber or PVC offer increased durability and last longer than low-quality ones, offering better value for money over time.
Maintenance Tips To Prolong Garage Door Seal Life
Regular cleaning and inspection of your garage door seal can help increase its longevity. Lubricating moving parts can also prevent wear and tear. Consider professional maintenance services as well to ensure that your garage door is working efficiently.
Regular Cleaning And Inspection
As someone who has replaced their garage door seal, I can attest to the importance of regular cleaning and inspection. A quick visual check every few months can help detect any wear or damage to the seals before they become a bigger issue.
To prolong its life, give it a good scrub with some soapy water and a soft brush once in a while. Make sure not to use any harsh chemicals that could break down the rubber or vinyl material.
By making cleaning and inspection a part of your regular maintenance routine, you will save yourself from costly repairs in the long run.
Lubricating Moving Parts
Another crucial step in maintaining your garage door seal is to lubricate the moving parts regularly. This not only extends the life of your seal but also ensures a smooth and quiet operation of your garage door.
You can use dishwashing detergent or silicone-based lubricant on all moving parts, including hinges, rollers, springs, and tracks.
I remember one time when I skipped this step during DIY replacement and ended up with a squeaky and dragging garage door that was frustrating to operate. After applying some silicone spray to the tracks and rollers, my door glided smoothly again without any resistance or noise.
Professional Maintenance Services
Garage door seals are subject to wear and tear, which is why professional maintenance services can be a great asset. Regular inspection and repair can ensure that your garage door seal remains functional for longer periods without developing leaks or drafts.
It’s important to note that seeking professional help at least once every year can minimize problems caused by regular use. Even if you’re experienced in DIY projects like replacing weatherstripping on your own, there may be other issues present in the mechanism of your garage door that only a professional would know how to fix.
By working with experts who deal with these types of repairs regularly, you’ll improve energy efficiency in your home as well as prolonging the lifespan of your garage door seal.
Conclusion
In conclusion, replacing your garage door seal is a quick and easy DIY project that can save you from expensive repairs in the long run. By following these simple steps and choosing the right type of seal for your specific needs, you can ensure a weather-resistant, energy-efficient garage.
Remember to also maintain your seals regularly with proper cleaning and lubrication.
FAQs:
1. What tools do I need to replace my garage door seal?
To replace your garage door seal, you will typically need a rubber mallet, pliers, a utility knife or scissors, and possibly a drill or screwdriver if you are replacing any screws.
2. How often should I replace my garage door seal?
It is recommended that you inspect your garage door seals annually for signs of wear and tear. If the weatherstripping appears cracked or damaged, it may be time to replace it.
3. Do I have to remove the entire old seal before installing a new one?
In most cases, it’s best to remove as much of the old seal as possible before installing a new one to ensure proper fit and function.
4. Can I install a new garage door seal myself?
Yes! Replacing your own garage door seal can be done with some basic tools and DIY skills. However, if you’re not comfortable working on your own doors or there are complicated issues that require attention from experienced technicians then hiring professionals would be recommended to avoid further damages or injuries caused by incorrect repair workmanship without safety precautions being followed properly in place.
Related Posts
How to clean Expoxy Garage Floor?
How to get a Hummingbird out of a garage?
How long do garage door openers last?
How much to insulate a Garage?
How to insulte garage ceiling rafters?
What is a Tandem Garage?
How to get a Bird out of a Garage?